Xencelabs Pen Tablet Bundle Review
When artists discus pen tablets one brand always comes up. This brand has been developing stylus based input devices for years and are known for the quality of their hardware, which is why they are so popular. They are also known for their high prices too, but I am a firm believer in you get what you pay for.
We are of course talking about Wacom and I’ve had the pleasure of working with them, as well as tested many of their products over the years. With that said, I’ve also experimented with many other drawing tablets too, but to date none have come close to stealing Wacom’s crown.
That is, If the internet is to be believed, about to change.
If you do a search for Xencelabs on YouTube you will see lots of reviews claiming that they are nipping at Wacoms heels, but is this to be believed? Are they really that good?
Well, these bold claims have me wondering if the hype is true, so when Xencelabs sent me their pen tablet medium bundle to try, I was eager to install it and start scribbling.
So, should Wacom be worried about the sudden rise of Xencelabs?
Read on to find out…
Unboxing
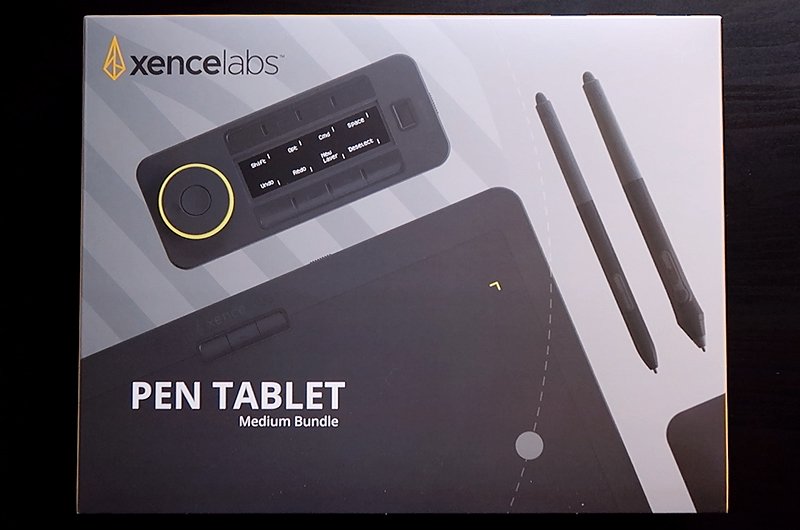
The bundle comes in a stylish box, with splashes of yellow around the sides and the back, giving it a fun yet professional look.
On opening the box, you first see a sheet from Xencelabs, thanking you for choosing their device, which is a nice, personal touch.
You’re then presented with the tablet. Its sleek, slim at just 8mm and smooth to the touch, plus its relatively light too which makes it easier to move and carry around.

It’s very minimalistic with a power slider, USB-C charging port and a Kensington NANO Lock for added security around its edges.
On the top you also have three configurable buttons, but more on these later.
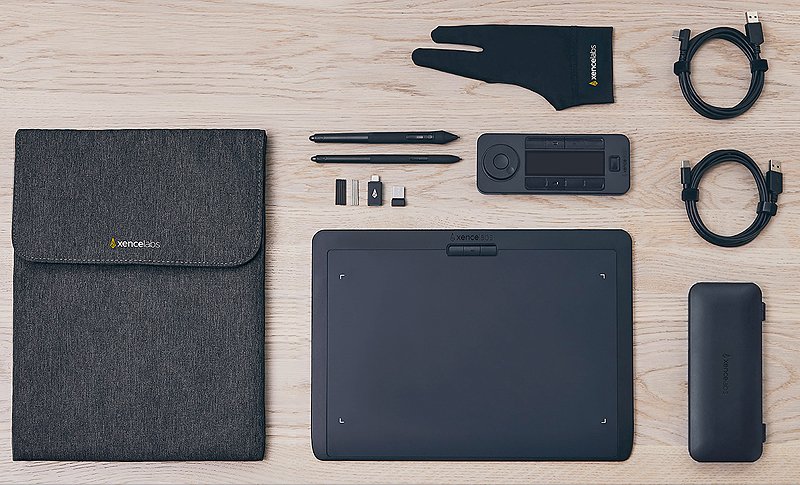
Digging deeper we find a carry case, which is a great addition to the bundle. This is perfect for those times when you’re traveling and need something more secure to carry the tablet and all the accessories in.

I was pleasantly surprised with the quality of this. Its thick and durable, with plenty of lined pockets to keep your tablet and accessories safe.
Next, we have the quick keys remote, and this is my favourite part of this bundle. Like Wacoms express key remote, this is fully configurable. It’s also larger but this is to make room for the OLED display which tells you what each button does. A helpful addition, especially when swapping between apps.

Next, we have a carry case, which reminds me of a glasses case. This is used to house the pen, and it does seem a bit big, but when you open it, you will find not one, but two pens. A three-button version, much like Wacoms own pro pen 3d, and a slim version which has the standard two button setup. On the opposite end of each Xencelabs have included the eraser which is missing from Wacoms Pro Pen 3D. Having two pens at your disposal is great because you may prefer one over the other, or you could configure them to work differently.

Also included in the box are a series of extra nibs, both plastic and felt, as well as a USB Bluetooth dongle, which is needed to connect the devices to your computer, and a USB-A to USB-C dongle, just in case.
There are the usual cables and manuals, but on top of everything else Xencelabs have also thrown in a smudge guard. Unfortunately, its slightly too small for my hand, I can still wear it but it’s a little tight.

Still, this is a fantastic bundle, giving you everything you need to dive in and start creating, either at home, in the office or while on the move.
Setup
Setting up the tablet and the quick keys remote is very simple.
First, make sure both are sufficiently charged and then insert the dongle into the computer, download the drivers from the Xencelabs website and follow the on-screen instructions.

When you then power on the tablet and quick keys remote, a blue light will flash to indicate that they are searching for the dongle. The remote even prompts you to install the drivers as a reminder.
The blue lights will then turn solid to indicate the devices are connected.

The software will then detect what devices you have attached, or connected, and set them up for you. It’s all very easy and there are also some handy tips that pop up while installing.

When done you will see a list of the available devices, so the tablet, quick keys remote and the pens. They are then available to select and configure, something we will cover later in the review.
The Tablet
Let’s look at the hardware now.
The tablet is roughly 12 inches wide, 9 inches high and only 0.3 inches deep, with an active area of around 10 inches by six inches.

This gives you plenty of room to work comfortably and I never felt like I was working on an area that was too small.
The tablet is also light at just over 700 grams, so its easy to carry around or work with in your lap, which you can easily do because it is also wireless.
There are three configurable buttons across the top and for an extra bit of flair, the corners of the active area light up. You can change the colour of these too if you prefer.

On the back you have six rubber feet to prevent it from slipping, and as mentioned earlier, the power button is located along the top along with the lights and USB-C charging port.
When working wirelessly the battery is said to last 16 hours and take 2 and a half hours to recharge from flat. I never got the impression that I was ever running low, but I did tend to top up the battery from time to time, just out of habit.
That’s the specifics out of the way, as for the tablet itself I was impressed with the overall build quality.

It feels solid and sturdy, plus the way it’s been designed means the seam which separates the top and bottom is under the tablet. Sometimes, when it’s placed around the edge of the tablet, the seam can get clogged with dirt and over time, the top and bottom can start to peel apart.
Overall, I liked the look and feel of the tablet and had confidence that with its quality, it would last me a while and I wouldn’t be looking to replace it in a years’ time.
The Stylus
This should actually read the styli because as you know, Xencelabs are kind enough to give you two to choose from. A thicker, three button pen, well, four buttons if you include the eraser on the tip, and also a slimmer, two button pen to, plus eraser.
I think it’s a good call adding the eraser to the tips on both pens. Wacom chose to remove it from their three-button stylus, something which I don’t personally mind because I never used that button, but I know some artists who saw it as a step back.
There’s no getting around just how similar the pens look to Wacoms, especially the three button pen. Even the hardware is the same with them both utilising electro magnetic resonance technology. They also both boast 8192 levels of pressure sensitivity, 60 degrees of tilt recognition and are both battery free.

In fact, they are so similar, you can use a Wacom stylus with the Xencelabs tablet. Then again, if you have a Wacom stylus you wouldn’t need this tablet in the first place would you.
Lets focus back on the Xencelabs pens.
To be fair, the design is good, so why change it? Both the slim and three button pen feel good in your hand. The rubber grip is comfortable, and they have a little weight to them. The buttons have a satisfying click when pressed and don’t feel spongy.
I also love the case. Initially I worried that it was too big but with everything that’s nestled inside it, the size makes sense.
The Quick Keys Remote
On to the star of the show, the quick keys remote.
I’m a big fan of these external shortcut remote controls, especially when working with a tablet. My main device is a 24 inch screen display, and to use it I need to slide my keyboard to one side. So a remote which gives me quick access to various shortcuts, is an essential part of my kit.
Add to this a dial so I can change my brush size quickly and I am in digital art heaven.
Luckily, the quick keys remote covers all these bases and then some.

Let’s take a step back and look at it. It’s a nice, compact design which fits in the palm of your hand, meaning you can access all the buttons, and the dial with just your thumb.
Like the tablet, you charge it with a UBS-C cable, and the battery is said to last anywhere between 25 and 50 hours. It can also be used while charging too.
On the bottom you have the same power slider button and indicator lights as the tablet. The underneath is covered in a thin rubber strip which helps keep it in your hand, or on your desk.
When connected, the OLED display will change to display a helpful reminder of what each button is currently configured to do, and you can change these to suit your own workflow. I loved this feature as I am forever forgetting how I have the buttons on the Express Key remote setup, especially when swapping between applications.
As with other similar devices the buttons and dial can even be configured on a per application basis. So, Photoshop is setup differently to ZBrush for example. Don’t worry though because the software will detect what applications you have on your machine and apply a pre-set button layout for you.
The configuration doesn’t just stop there, you can also change the labels to something more memorable and adjust their orientation if you use the remote at a different angle.

The ring has a nice fluidity to its movement, with the button in the middle used to again, change its use. You can even adjust the light around the ring too, so the colour corresponds to a specific action or application.
All in all there are said to be forty different shortcut options available to you, so more than enough.
Configuration
As you can already tell there are a heap of configuration options with this bundle.
Through the Xencelabs software you can setup each bit of hardware just as you want it, and its relatively straight forward to do.
With the pen tablet you can adjust the colour of the lights around the corners of the active area, as well as change the brightness. You can also set these up so they are different depending on what software you are using.
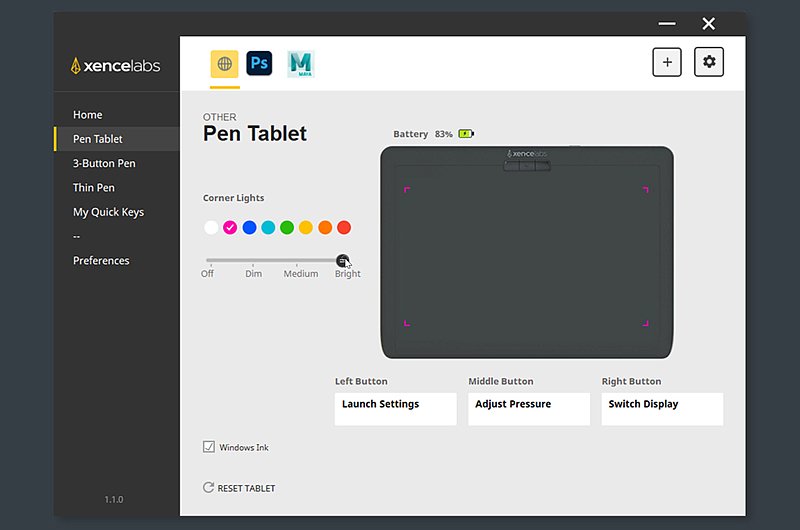
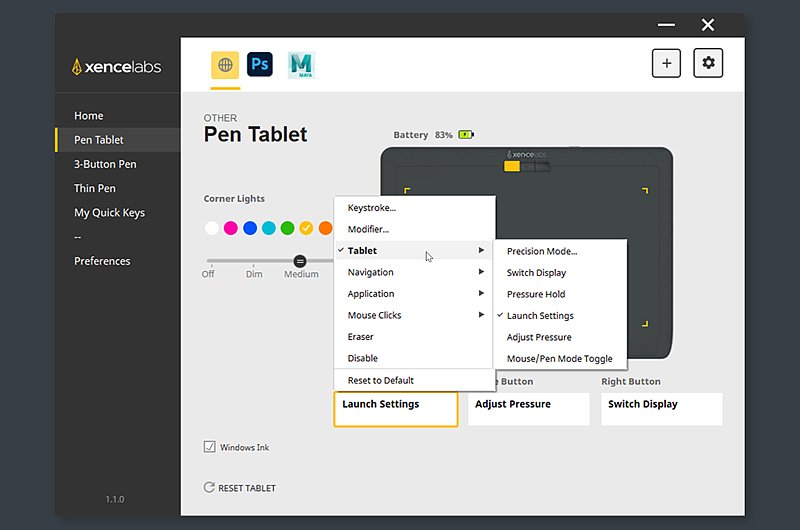
There are options to configure the buttons, so you could define a keystroke, or a modifier if you just want it to represent Alt or Control for example. There are lots of options to experiment with.
With the three button pen you can control the pressure sensitivity, and also what each button does. You also have the option to disable the pen buttons or the tilt functionality if you prefer.
There are advanced options to fine tune the pressure, again to tailor it to your specific art style. You can do this for both the eraser and the main pen tip.

The options for the thin pen are pretty much the same. And like everything else, they can be configured differently depending on what software you are using.
Finally, we have the quick keys remote.
By default, there are four modes available to you when using the dial, so you can cycle through the ring scrolling the canvas, zooming in and out of it. Rotating it and finally adjusting the brush size, which is what I used it for mostly.
Each mode has its own colour too.

You have button options across the bottom, and Xencelabs give you five sets to configure per application. You use the main button at the bottom of the remote to cycle through them.
The software will automatically detect what you have installed on your machine and preconfigure the buttons with the most commonly used actions, which is a nice touch and a time saver. With Photoshop, for example, two set are created, one for sketching and another for painting.
What’s good is you can also rename the buttons too, so you aren’t stuck with generic names. These represent what is displayed on the OLED display.
Finally, under preferences, you have options for adjusting the screen area mapping and when the tablet will be put to sleep if not used, which helps maintain battery life.
All in all, the software is great to use and setup. I had heard reports of it being buggy, but I didn’t really notice anything major while using it, so I can only assume the bugs had been addressed in a recent update.
The Tablet In Use
When I review a tablet, I like to set myself a project and use that tablet exclusively to see the project through to the end. I find this helps me get a more balanced overview of what it’s like to use it over a period of time.

Before I started rendering this sketch, I did some basic tests to check the pressure and how accurate the lines were. I also wanted to compare the pen to the Wacom stylus too, seeing as you can use both with the tablet.
These are better seen in the above video.

The lines and circles next to the X are the Xencelabs pen. As you can see, the pressure is coming through nicely, we are getting faint lines and thicker, darker ones too. What I also noticed is there isn’t much jitter when drawing lines, which is good, but these are quick strokes so I wouldn’t expect to find any major issues here.
Next to the W are the tests done with the Wacom Pro Pen 3D.
You can see the pressure isn’t the same, we seem to be losing some of the fainter parts of the stroke. So yes, you can use a Wacom stylus with this tablet, but it doesn’t seem to work as well. I also noticed that the button mappings don’t transfer too.
I also tried the ruler test, so you basically draw along a ruler and see how straight the line is. What I’m looking for are smaller jitters which means the pen isn’t drawing accurately.

The first two lines are the Xencelabs pen, and they look straight to me.
Now is the Wacom stylus, and remember this isn’t technically designed to work with this tablet. The lines are heavier, but also there’s more of a wave too.
Ok, enough on how the pen performs, let’s cut to the chase, it performed really well. Now on to what you really want to know, what the bundle like to use?
It took me a while to get used to working on a tablet like this again because I’m used to using a pen display, but once I settled in, I enjoyed the experience.
The tablet, quick keys remote, pen and software all worked in harmony with each other. I did have a few issues from time to time with the pen not being registered when I swapped applications, but this turned out to be Windows Ink, which I had disabled earlier in the Xencelabs software. Once that was enabled again it was plain sailing.
Another issue I had was using the plastic nib. After my first hour of use I noticed scratches on the tablet which got me concerned. If it was this bad after an hour, what would it be like after a week, a month, or a year. Would it even last that long?
I decided to swap to one of the felt nibs that are supplied, and they were much better and didn’t leave any trace on the tablets surface.
What was even better is the original marks vanished when the tablet was wiped with a damp cloth, so it was good to know they weren’t permanent.
All in all I was impressed with the tablet, the pens and even the software.
Should You Invest?
What Xencelabs have given us is a great bundle, with everything you need to work digitally, be that painting, sculpting, or working in 3D. Now it’s certainly not cheap, but I think for the quality of the hardware and the software, it shouldn’t be.
So how does it compare to the competition? Let’s look at the numbers.
The pen tablet medium bundle currently costs around £319, if bought direct from the Xencelabs website. Remember, this includes everything, the wireless tablet, quick keys remote, pens, carry case and glove. So, everything you need.
The closest Wacom tablet would probably be the Intuos Medium which is around £179, although the pressure sensitivity is lower at 4096 levels, and it is a slightly smaller tablet. Add to this the Express Key remote at £99, the Pro Pen 3D which is around £75 a carry case and a smudge guard and you could be looking at around £370, so the Xencelabs bundle is still cheaper.
In the scale of things, if you must have a Wacom device you will be fine with shelling out the extra £50 and won’t spend much time shopping around. Then again, if you’re on a budget the Xencelabs bundle is more affordable, and when it comes to quality, I didn’t feel like it was an inferior choice.
So, are the claims that Xencelabs is a viable Wacom competitor founded? Well, I must admit that with a bundle as good as this, you would be silly not to give them and the pen tablet medium bundle, even with its long name, a second look.
Although Xencelabs supplied the device for me to test, the opinions offered in this review are my own.