MocapX Review
With the introduction of the True Depth camera, Apple opened the doors for facial tracking to be used for more than just unlocking your phone. Since the iPhone X, many developers have worked hard to exploit this new technology, and one obvious area, was motion capture.
Traditionally, automating facial animation has been done using a simple audio file and a set of defined poses, but now MocapX wants to put an end to that and allow you to capture detailed facial animation directly from your phone.
In theory this sounds perfect for developers. There’s no need for expensive equipment, you just download the app, install the plugin and you are good to go. Any animator can now save time by simply recording the animation and editing it in Maya, rather than keyframing it from scratch.
This does sound like it could be ideal, but does this app live up to its promises?
Read on to find out…
The MocapX App
You can download the MocapX app for free from the app store, and you initially don’t need to pay anything to use it.

As it stands, there are currently three options available. You can continue to use the free version but you are limited to only thirty seconds of recording per session, and this is restricted to the device you are using, be it an iPhone or iPad.
You also don’t get access to the real-time facial capture option in Maya.

If you like, you can buy more time, so you can increase that basic thirty second limit. The prices range from twenty dollars for five minutes up to half an hour for fifty dollars, so this can get quite expensive if you plan to do a lot of capturing. This option still also restricts you to only recording on your device too.

Finally, you have the pro option, which is a one-off payment of $299 and unlocks everything. So, you get access to live recording, plus you are no longer limited when recording on your phone. You also open the option for head and eye tracking, and multiple device support.

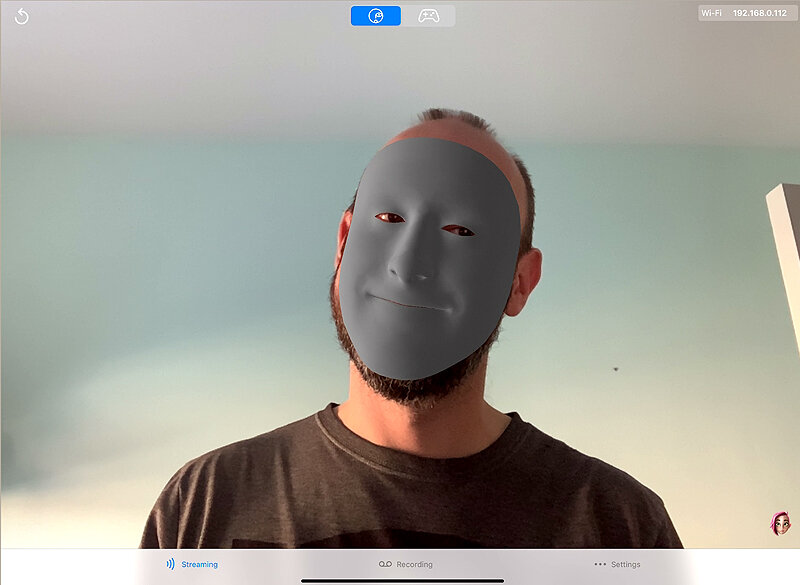
The MocapX app is itself very minimalistic. Once opened you are presented with the front facing camera’s view, so you essentially see yourself. Well, it is you, but like you’re wearing a mask which is the default model tracking your head and facial movements.
It does this quite well, although some of the mouth shapes aren’t accurate and the eyebrows seems to move together instead of separately. All in all though, its good to see a 3D model working so you get an idea of what data you would end up with.
You can change the default model to a more basic version, but what would be nice is if you could take your rig and see that moving on the phone instead. Not sure how possible that would be though.
Along the bottom of the screen you have options for streaming the capture, or recording it onto the device. As mentioned earlier, with the free version you can record up to 30 seconds of data at a time so if you need to record for longer you will need to pay.
You also have the settings tab where you can find information about the app, and the connection settings which allow you to stream to a desktop running Maya.

In addition to the main facial capture option you can also switch to a remote control. Again, this is used mainly when connecting to Maya, and it allows you more manual control over your character or as shown in the developers example videos, a vehicle.
Custom Rig Setup
In addition to being able to record data on your phone, you can also take these clips, which MocapX calls them, and apply them to any rig inside Maya.

After you install the plugin you are given a new MocapX shelf with all the main tools. I decided to test this with a facial rig I’d created a while ago, just to see how flexible it is when using a custom rig.
The first step is to tell MocapX what controls you are using, so you select all the facial controls and click the Create MocapX Attribute Collection button.
Next you need to spend some time setting up the main poses the clip data will drive. There are a lot of them, but the developers provide a handy pose board which shows you what the poses should look like.

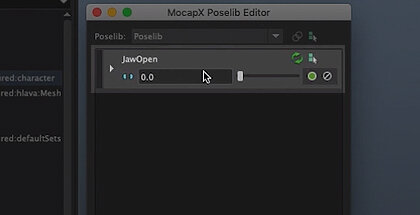
So, if you were to setup the cheek puff, for example. All you do is pose the cheeks, select the controls and click the plus icon next to the name on the tab. The pose is then stored in the pose library, and you can adjust it with a slider, just how you would if you were editing a blendshape.
If you want to create a more custom shape, like having both eyes blinking at the same time, you can follow the same steps but instead use the Create MocapX Pose button on the shelf to store the pose. You can then update the name in the pose library to whatever you like.

The pose board does make things easier, so it is a nice addition, but a reference image from the side of the head would be useful too. The developers do provide an example head for you to look at, so I ended up referring to that more than the pose board to get the correct poses.
Another feature I like is the ability to update poses you have already created. At first, I didn’t realise this feature existed, so to update a pose meant I had to delete it and start again. The process is a little different to the tutorial videos though, which is what threw me initially and I only discovered this while experimenting with the tools.
In the tutorial video there is a green update icon, which wasn’t visible on my version. Instead, to update a pose you need to press the blue, solo pose button first and then a plus icon appears. You can then use this to update the pose.

This should save you a lot of time.
Streaming vs Recording
Once the rig is setup with all the poses needed you can then load a clip and see how it looks, and an example clip comes supplied with the files you download. To do this you first create a clip reader node and then point it to the clip file.
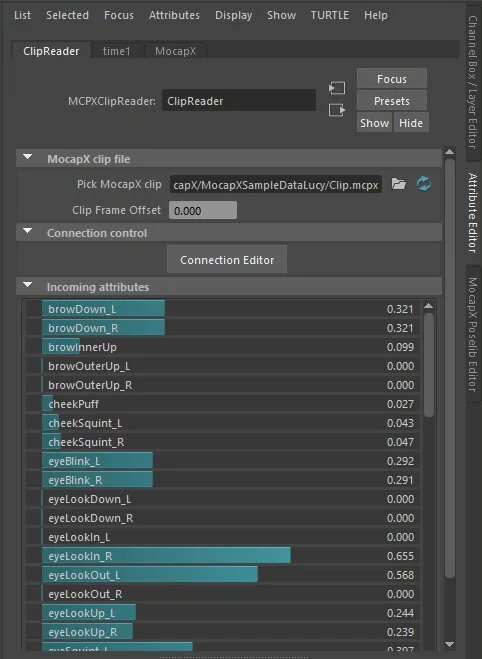
Once loaded you will see all the data appear below it, and it will animate as you adjust the time slider. The next stage seemed a little strange to me, like there should be another button to automatically do this for you, but there wasn’t.
What you have to do next is manually connect the clip reader attributes to the pose weight attributes, but you can only do this one at a time. This does take a while and it quite tedious, so I wrote a script to do it for me. I do wonder why the developers haven’t supplied something similar though. Everything else seems quite well though out apart from this stage.
UPDATE: You can now automatically connect the attributes, and you can see this in action here.
One other thing I had to do was adjust the data for the head and eye tracking, just reducing its effect slightly because the values were too large. Again, this ended up being part of the script I wrote but it would be a nice feature for the developers to add. An idea would be to simply introduce an offset on the values, either globally or on a per pose basis.

Once finally connected I could see the facial features, head and eyes moving and following the data, which all came through well. What’s good is that with the data imported you aren’t then simply stuck with it. You can animate on top of it, so you can tweak the capture before you bake it onto the controls.
That was the clip reader tested and working, so next I wanted to try live streaming, although this turned out to be nowhere near as straight forward.
No matter what I tried I just couldn’t get the Wifi connection to work. Even experimenting with some of the options the developer game me, like disabling my firewall, didn’t get it to work so I had to rely on the USB connection instead, but this also had issues.
For it to work I needed to have my iPad connected to my PC with iTunes running. Firstly, I don’t use iTunes on my desktop, I just don’t like it, but to get this to work I had to install it. Once installed though I had issues with it not recognising my iPad and this continued, so some days it would work and others it wouldn’t and I would end up connecting, disconnecting, running iTunes, closing iTunes…it was frustrating.

When I finally got it to connect, and got Maya to recognise it too, I then ran into issues with the head moving uncontrollably. I did get this to reduce slightly by reorienting the iPad, so it was in more of a portrait position, but then I tried reconnecting some of the head connections and that seemed to fix things.
Once it was up and running though, it worked well, although there were a few glitches every now and then, so once recorded you would need to go in and clean it up.
Should You Invest?
There is a lot to like about MocapX. When you eventually get it up and running it takes a lot of the strain out of facial animation, but you have to hit that sweet spot with the poses to get the best out of it.
Obviously, this is something that will come naturally the more rigs you setup, but your first one will involve a lot of trial and error.
There are areas of MocapX which work seamlessly, like the app and the Maya plugin, but when you try and connect the two, things start to break down.
Connecting the iPad to Maya just ended up being more trouble than it was worth, so most of the time I ended up recording the data on the iPad, exporting it and then importing the clip into Maya, a workflow that actually worked well for me. It is a real shame though as having the device connected could be a really powerful feature.
You get a lot to play with in the trial version so downloading it is a no brainer, unless you have an iPhone or iPad that doesn’t have the true depth camera. You never know, you may not experience the same issues I did so its worth a try.
Upgrading is where things get complicated, but if you manage to get things working with the trial version and you plan on capturing lots of data, then actually, upgrading to the pro version would be beneficial and cheaper in the long run.
All in all, MocapX is a great facial capture solution. Yes, there are connection issues and some bugs to iron out, but if you can get around that you will find a powerful tool which could save you time and money.
Find Out More
Although MocapX supplied the app for me to test, the opinions offered in this review are my own.